Lenovo T440p Coreboot

This will guide you through the process of installing coreboot with Tianocore on the Lenovo T440p.
Rewrote some parts today and tested it - fully working (16.06.2022) | First Post was 28.11.2019
The T440p is the first Haswell series device to support coreboot and thus the most powerful to support it.
It features great upgradability which makes it the perfect dev workstation.
Read the complete instructions first and then follow along
Materials:
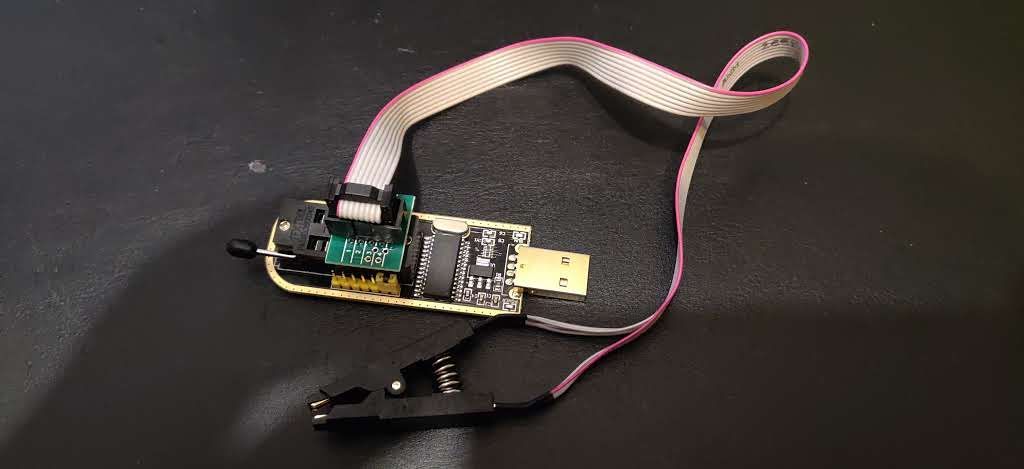
- ch341a SPI flasher always disconnect the programmer from the USB port before connecting/disconnecting it from the EEPROM and check if it uses 3.3V
- Alternativly use a Raspberry PI as SPI programmer https://tomvanveen.eu/flashing-bios-chip-raspberry-pi/
- Screwdriver for dissassembly according to the hardware maintenance manual
- Coreboot
- A PC running a Linux Distro (install flashrom with your package manager)
- also install these with your package manager (arch user here soooo...):
sudo pacman -S base-devel curl git gcc-ada ncurses zlib nasm sharutils unzip flashrom
at the time of writing I had to downgrade gcc (also libs and ada) to version 10.2.0
I used the downgrade command on arch:
sudo downgrade gcc-libs gcc gcc-ada
Organization
To make rebuilding easier create a directory for your backups and blobs. I've called mine ~/t4/
mkdir ~/t4/
The process
Disassembly and reading
Next take out the battery and unscrew the access door.
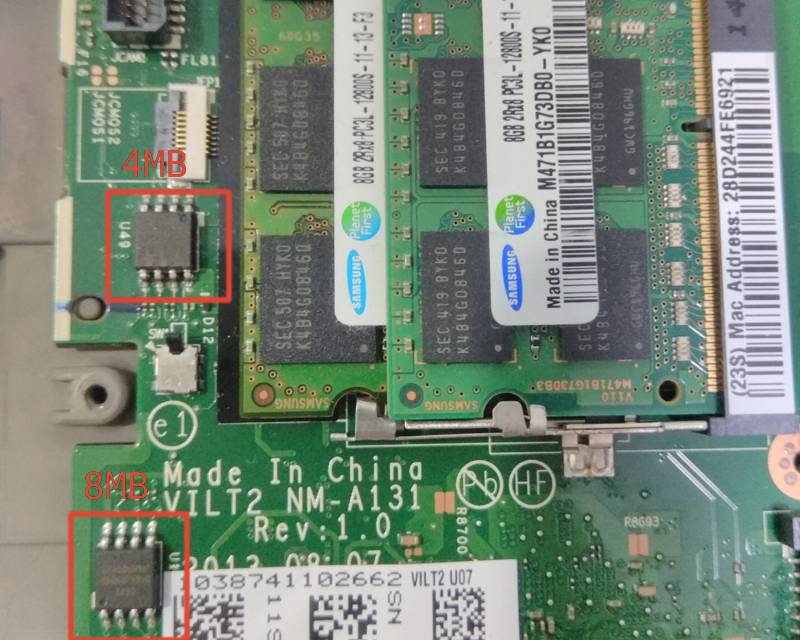
Take it apart until you see both EEPROM-chips next to the RAM:

Assemble the SPI flasher and make sure it's the 3.3v variant:

Connect the SPI flasher to the 4MB (also called top) chip and connect it to your PC - then:
cd ~/t4/

sudo flashrom --programmer ch341a_spi -r 4mb_backup1.bin

sudo flashrom --programmer ch341a_spi -r 4mb_backup2.bin

diff 4mb_backup1.bin 4mb_backup2.bin
Only if diff outputs nothing continue - else retry
Then connect to the 8MB (also called bottom) chip and repeat:
sudo flashrom --programmer ch341a_spi -r 8mb_backup1.bin

sudo flashrom --programmer ch341a_spi -r 8mb_backup2.bin

diff 8mb_backup1.bin 8mb_backup2.bin
Again: only if it outputs nothing continue
Original ROM
Combine the files to one ROM (the System sees these chips combined anyway)
cat 8mb_backup1.bin 4mb_backup1.bin > t440p-original.rom
SAVE THE ROM SOMEWHERE SAFE and in multiple locations!!!
Export blobs
Clean old attepts, pull from github and checkout to the commit I used (you can also try master but then you are on your own :P) and build ifdtool
cd
rm -rf ~/coreboot

git clone https://review.coreboot.org/coreboot
cd ~/coreboot
git checkout e1e762716cf925c621d58163133ed1c3e006a903
git submodule update --init --checkout

cd util/ifdtool && make
Use the rom from before, export the blobs and move them to your t4 folder:
./ifdtool -x ~/t4/t440p-original.rom

mv flashregion_0_flashdescriptor.bin ~/t4/ifd.bin

mv flashregion_2_intel_me.bin ~/t4/me.bin

mv flashregion_3_gbe.bin ~/t4/gbe.bin
Obtaining mrc.bin
We'll obtain this blob from a haswell chromebook firmware image (peppy in this case) but first we need to build the cbfstool for extraction:
cd ~/coreboot

make -C util/cbfstool

cd util/chromeos

./crosfirmware.sh peppy

../cbfstool/cbfstool coreboot-*.bin extract -f mrc.bin -n mrc.bin -r RO_SECTION

mv mrc.bin ~/t4/mrc.bin
Configuration
Now the fun part :)
Either you add my known working config to ~/coreboot/.config, or you configure coreboot yourself via nconfig.
Easy and working route: my .config
go back to the coreboot folder and open .config in nano or vim ...
cd ~/coreboot
nano .config
Paste my config and edit the path to the t4 folder to reflect your path (if you followed me here so far you should just have to change the username to yours). Omit the last two lines if you have no bootsplash image - here is mine
CONFIG_USE_OPTION_TABLE=y
CONFIG_TIMESTAMPS_ON_CONSOLE=y
CONFIG_VENDOR_LENOVO=y
CONFIG_CBFS_SIZE=0x200000
CONFIG_LINEAR_FRAMEBUFFER_MAX_HEIGHT=1600
CONFIG_LINEAR_FRAMEBUFFER_MAX_WIDTH=2560
CONFIG_IFD_BIN_PATH="/home/conor/t4/ifd.bin"
CONFIG_ME_BIN_PATH="/home/conor/t4/me.bin"
CONFIG_GBE_BIN_PATH="/home/conor/t4/gbe.bin"
CONFIG_CONSOLE_CBMEM_BUFFER_SIZE=0x20000
CONFIG_TIANOCORE_BOOT_TIMEOUT=2
CONFIG_HAVE_IFD_BIN=y
CONFIG_BOARD_LENOVO_THINKPAD_T440P=y
CONFIG_TIANOCORE_BOOTSPLASH_FILE="/home/conor/t4/bootsplash.bmp"
CONFIG_HAVE_MRC=y
CONFIG_MRC_FILE="/home/conor/t4/mrc.bin"
CONFIG_UART_PCI_ADDR=0x0
CONFIG_VALIDATE_INTEL_DESCRIPTOR=y
CONFIG_H8_SUPPORT_BT_ON_WIFI=y
CONFIG_HAVE_ME_BIN=y
CONFIG_CHECK_ME=y
CONFIG_USE_ME_CLEANER=y
CONFIG_HAVE_GBE_BIN=y
CONFIG_SUBSYSTEM_VENDOR_ID=0x0000
CONFIG_SUBSYSTEM_DEVICE_ID=0x0000
CONFIG_I2C_TRANSFER_TIMEOUT_US=500000
CONFIG_SMMSTORE_SIZE=0x40000
CONFIG_DRIVERS_PS2_KEYBOARD=y
CONFIG_TPM_DEACTIVATE=y
CONFIG_SECURITY_CLEAR_DRAM_ON_REGULAR_BOOT=y
CONFIG_POST_IO_PORT=0x80
CONFIG_PAYLOAD_TIANOCORE=y
CONFIG_TIANOCORE_BOOT_MANAGER_ESCAPE=y
CONFIG_TIANOCORE_SD_MMC_TIMEOUT=1000
run nconfig to populate the other options and exit
make nconfig
(save with F6 and exit with F9)
Normal route: your .config
Go back to the coreboot folder and run nconfig, select the device (Mainboard: Lenovo, Mainboard model: T440p, Chipset: add the blobs paths from before)
Then configure to your liking...
cd ~/coreboot

make nconfig
(save with F6 and exit with F9)
Building and flashing
make crossgcc-i386 CPUS=16

make
(CPUS is the number of threads to use so please change it to your PC's specs)
(Skip to "Update process" now if you already have coreboot installed)
Split the built ROM for the 8MB chip (bottom) and the 4MB chip (top)
cd ~/coreboot/build

dd if=coreboot.rom of=bottom.rom bs=1M count=8

dd if=coreboot.rom of=top.rom bs=1M skip=8
Connect the programmer to the 4MB chip and run:
sudo flashrom --programmer ch341a_spi -w top.rom
Connect the programmer to the 8MB chip and run:
sudo flashrom --programmer ch341a_spi -w bottom.rom
Boot
and hope for the best ;D
Update process
Build a new coreboot ROM.
Then set the kernel to iomem=relaxed so it allows internal flashing.
In /etc/default/grub add iomem=relaxed to the space seperated list:
GRUB_CMDLINE_LINUX_DEFAULT="iomem=relaxed quit splash"
Then apply the config:
sudo grub-mkconfig -o /boot/grub/grub.cfg
Reboot.
Make a backup of the known working ROM:
sudo flashrom -p internal:laptop=force_I_want_a_brick -r ~/t4/coreboot-backup.rom
Then flash new ROM:
sudo flashrom -p internal:laptop=force_I_want_a_brick -w ~/coreboot/build/coreboot.rom
Reverting to Stock
Remember the backup you made? Good thing you still have it ;)
Either you messed up and can't boot - then you need to hardware flash, or you just want to have the old bios back so you can run hackintosh or whatever...
(In this tutorial the orignal ROM was named t440p.rom but in this part I'll refer to it as original_backup.rom)
Can't boot
Good thing you saved the t440p-original.rom in multiple places right?
Take you backup ROM and split it so you have a part for the 4MB chip and a part for the 8MB chip (the backup.rom should be 12MB):
dd if=t440p-original.rom of=bottom.rom bs=1M count=8

dd if=t440p-original.rom of=top.rom bs=1M skip=8
Connect the programmer to the 4MB chip and run:
sudo flashrom --programmer ch341a_spi -w top.rom
Connect the programmer to the 8MB chip and run:
sudo flashrom --programmer ch341a_spi -w bottom.rom
Done.
Can boot
Take your t440p-original (12MB)
Then set the kernel to iomem=relaxed so it allows internal flashing.
In /etc/default/grub add iomem=relaxed to the space seperated list:
GRUB_CMDLINE_LINUX_DEFAULT="iomem=relaxed quit splash"
Then apply the config:
sudo grub-mkconfig -o /boot/grub/grub.cfg
Reboot.
Make a backup of the known working ROM:
sudo flashrom -p internal:laptop=force_I_want_a_brick -r ~/t4/coreboot-backup.rom
Then flash the backup ROM:
sudo flashrom -p internal:laptop=force_I_want_a_brick -w ~/t4/t440p-original.rom
Done.
